Custom Sway Bar Endlinks
We have a wide range of sway bar endlink components that can be assembled to meet the needs of your build. Start by evaluating and measuring your current endlinks using our guide, then choose the components from the order form below and hit submit to get started on your custom endlink order.
Custom Endlink Order Form


Endlink Measurement Guide
Following this guide will give you the information needed to confidently order endlinks.
Items Needed
- Measurement Tool(s) (Calipers are recommended)
- Paper and Pen for Notes
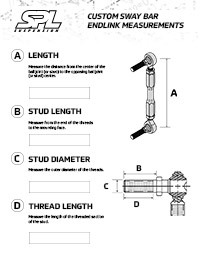
Feel free to download and print our sway bar measurement template PDF for your measurement notes.
Step 1: Measure the Length

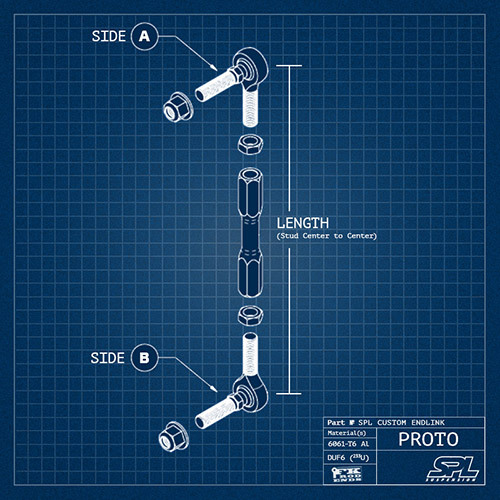
Measure the length from the center of the ball joint on Side A to the center of the ball joint on Side B. Write down the measurement and label it for reference later.
Step 2: Measure the Studs

Starting on one end of the endlink (either is fine). Measure the outside diameter of the stud threads. Write down the measurement and label it as "Side A". This is going to be used to choose the proper stud diameter.

Measure the length of the stud from the mounting face to the end of the threaded section. Write down the measurement and label it as "Side A". This is going to be used to determine the proper stud length.
Repeat this for the opposite side (Side B) of the endlink.
Step 3: Determining the New Endlink Length
Skip this step if you already know the length you need for your custom endlinks.
The ideal sway bar endlink length is the length required to make the sway bar lever arm horizontal with the ground. This ensures the sway bar has maximum travel range and spring rate contribution (effectiveness). This ideal length should be as close to the mid-point of the endlink adjustment range as possible.

There are a number of factors that alter the ideal endlink length. Changes in ride height, coilovers or control arms changing the mounting point, sway bar geometry, clearance, and more. Apart from aftermarket parts that obviously change mounting points, the reason the ideal length changes is because the sway bar is attached to the body of the vehicle. If you lower the body 40mm then the sway bar moves 40mm as well, however the other mounting point for the endlink might only move 10mm, requiring a 30mm shorter endlink.
Taking Measurements
- Set car at settled ride height with the wheels straight and on the ground
- Set sway bar in a horizontal position, with the adjustment holes as parallel to the ground as possible
- Measure from the suspension mounting point to the sway bar mounting hole(s)
Note: If you run a shock with a large bracket for the endlink mount (i.e. Öhlins) you may need a spacer for clearance. Let us know in the comments.

Questions?
Send us an email with your questions.

